How to setup WireGuard VPN on an iPhone

Secure network concept with VPN.

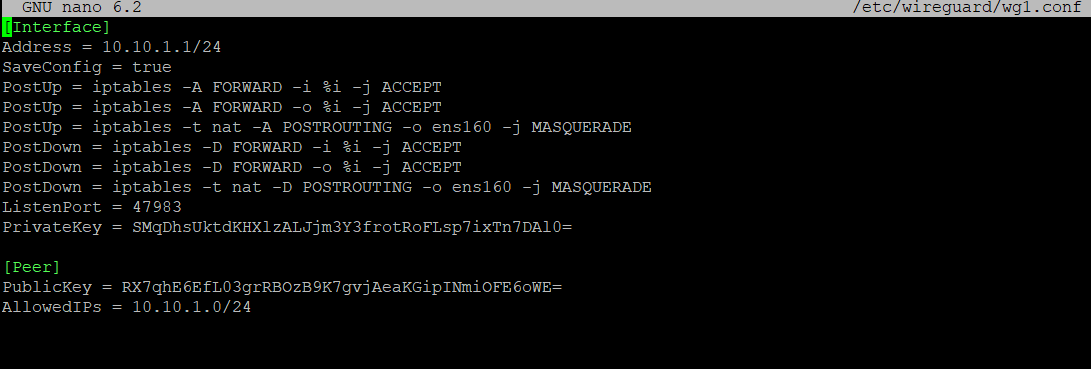
Many a time we are in public places like the airport and use the public internet on our phones which is easy to eavesdrop on. In this article, we will be setting up the WireGuard VPN client on an iPhone. I have already set up my WireGuard VPN server, you can check out my previous article on setting up the WireGuard server.

We will create a separate interface called wg1 for the iPhone, using port 47983 and a new Private and Public key. We will also route all the internet traffic through the VPN server. We are using an iPhone 12 with ios 15.6.

Table of Contents

Add a new WireGuard interface.

To add a new WireGuard interface we will run the ip link command:

				
					ip link add dev wg1 type wireguard


Generate a new Public and Private Key

We will generate the new public and private keys in the /etc/wireguard path and use that for the new VPN connection of the iPhone. Here I’m using private1.key & public1.key since I already have a key pair named private.key & public.key.

				
					wg genkey | sudo tee /etc/wireguard/private1.key
sudo cat /etc/wireguard/private1.key | wg pubkey | sudo tee /etc/wireguard/public1.key


Then display and copy the private1.key to use on the iPhone.

				
					sudo cat  /etc/wireguard/public1.key


Create the new wg1.config file

We will create and configure the wg1.conf file on the WireGuard server. We will include the private key, new sub-net of 10.10.1.0/24, and listening port of 47983. For detailed information please check this post.

				
					sudo nano /etc/wireguard/wg1.conf


					Interface]
Address = 10.10.1.1/24
SaveConfig = true
PostUp = iptables -A FORWARD -i %i -j ACCEPT
PostUp = iptables -A FORWARD -o %i -j ACCEPT
PostUp = iptables -t nat -A POSTROUTING -o ens160 -j MASQUERADE
PostDown = iptables -D FORWARD -i %i -j ACCEPT
PostDown = iptables -D FORWARD -o %i -j ACCEPT
PostDown = iptables -t nat -D POSTROUTING -o ens160 -j MASQUERADE
ListenPort = 47983
PrivateKey = SXXXXXXXXXXXXXXXXXXXXXXXXXXXXXXXXXXXXXXXXXXXX=


Allowing Through firewall

Since we are using a UDP port 47983 for the connection we will have to allow it through the Ubuntu Firewall. And then check the status.

				
					sudo ufw allow 47983/udp
sudo ufw status


Activating the wg1 interface on the WireGuard server and starting at boot up

We will activate the wg1 interface and start the interface at start-up.  If you get any error that the wg1 failed to start, restart the server.

				
					ip link set up dev wg1
sudo systemctl enable wg-quick@wg0.service
sudo systemctl start wg-quick@wg0.service
sudo systemctl status wg-quick@wg0.service


Setting up WireGuard client/peer on an iPhone

Install WireGuard from the app store. Add a tunnel from scratch and change accordingly.

Name – Sutaantra

Generate the Key pair – and copy the public key

Addresses – 10.10.1.2/24

Listen port – automatic

MTU-automatic

DNS Server – 192.168.10.5

Click on Add peer

Public key – Provide the public key of the WireGuard server

Preshared Key – we are not using any

End Point – 103.179.39.30:47983

Allowed IP – 0.0.0.0/0

Adding iPhone client public key to WireGuard server

Lastly, we will add the details in the WireGuard server doe the final config of wg1 will look this.

				
					[Peer]
#public key of iPhone Client#
PublicKey = lxxxxxxxxxxxxxxxxxxxxxxxxxxxxxxx=
#VPN tunnel IP of iPhone client#
AllowedIPs = 10.10.1.0/24


Other post  regarding WireGuard – How to set up VPN using WireGuard

Check Our

Related Posts