Setting up of WireGuard
What is WireGuard?
WireGuard is an open-source protocol that implements an encrypted high-performance Virtual Private Network originally developed by Jason A. Donenfeld. It supports both IPv4 and Ipv6.
Traditional VPN like IPSec and OpenVPN uses Transport layer Security and certificates to authenticate and create tunnels between endpoints. In WireGuard it uses public and private keys to establish the encrypted tunnel. Initially, it was developed for Linux-based systems but now you can configure it on windows based clients also. Since WireGuard uses key pairs, it doesn’t support any kind of username/password authentication and hence cannot be integrated with LDAP, Active Directory, RADIUS, or local user database. So it is very difficult to manage a large number of users. It also doesn’t support any kind of MFA.
Overview of Network set-up
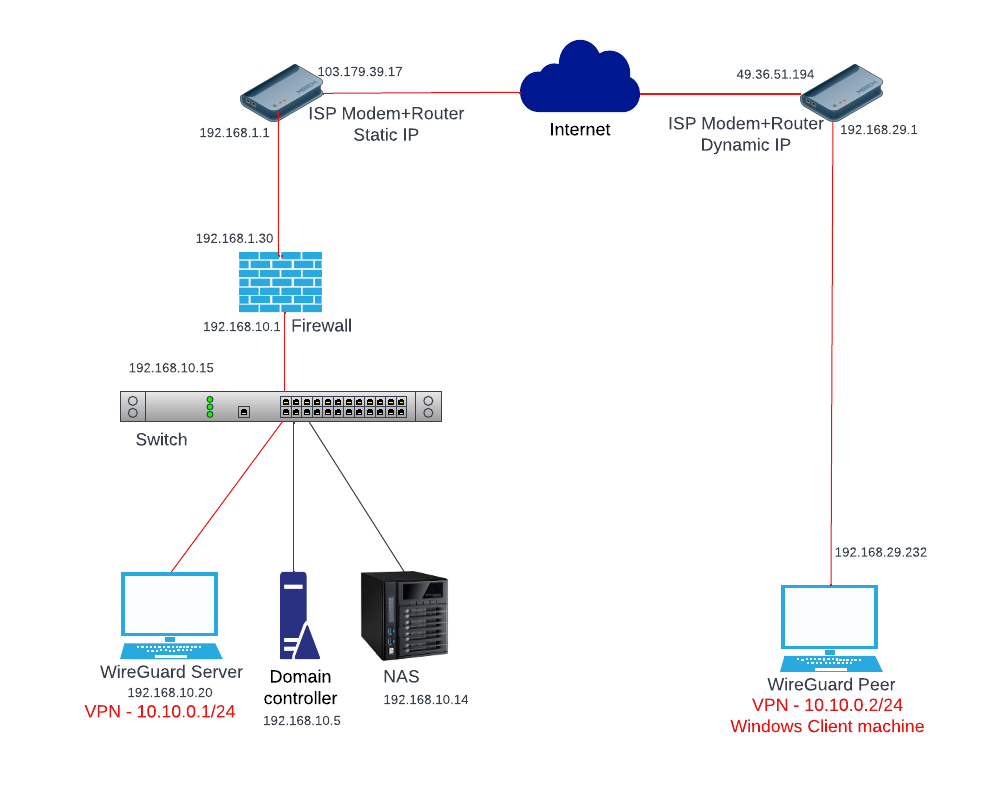
In this article, we will set up WireGuard on a Ubuntu Server running 22.04 LTS behind a firewall in the local network. Establish a VPN connection from a Windows client machine and then route the client’s internet traffic through the WireGuard server. Also, access all the network resources like domain controller, NAS from the Windows machine. The network diagram looks like below.
Setting up WireGuard Server on Ubuntu
Installing WireGuard and generating the Key pair
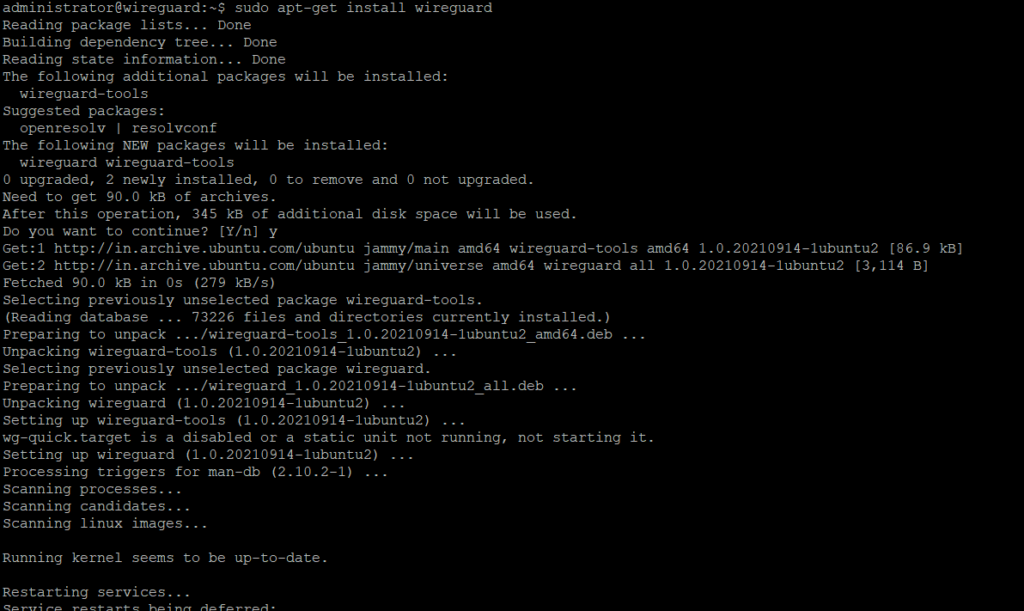
As a first step, we will install WireGuard on the Ubuntu server. I have already set up the Ubuntu server and it’s running. We will connect to the server using SSH and run the following command.
					sudo apt-get update && sudo apt-get upgrade -y
sudo apt-get install wireguard
Once installed, we will generate the public and private keys in the /etc/wireguard path, since they will be required to set up the tunnel. Once the private key is generated we will set up the corresponding public key. The first command generates the private key and writes it to the private.key. The next command reads the private key and generates the corresponding public key and writes it to the public.key.
					wg genkey | sudo tee /etc/wireguard/private.key
sudo cat /etc/wireguard/private.key | wg pubkey | sudo tee /etc/wireguard/public.key
Next, we will check if only root users have access to the private keys and then copy the public key which we will use on WireGuard client/peer.
					sudo ls -l /etc/wireguard/public.key
sudo cat  /etc/wireguard/public.key
Creating the WireGuard Server configuration files
In this step, we will create and configure the wg0.conf file on the WireGuard server. We will include the private key, separate IP address for VPN tunnel, and Listening Port. By default, WireGuard listens to UDP 51820. Here we will use some other port.
sudo nano /etc/wireguard/wg0.conf
And append the following line
					###WireGuard VPN server-Ubuntu-wg0.conf file###

[Interface]

##WireGuard server Private Key##
PrivateKey = MFxxxxxxxxxxxxxxxxxxxxxxxxxxxxxxxxxxxxxxxxxxxxxxxxxxxxxxg2s=

##WireGuard server private IP address"
Address = 10.10.0.1/24

##WireGuard server port##
ListenPort = 47982

SaveConfig = true
Other configuration of WireGuard server config files.
With the above configuration files, the WireGuard peer should be able to connect to the WireGuard server. However to route the Peer’s internet traffic through the server some additional changes need to be done – IP forwarding, Iptables masquerade, iptables input, and iptables forward rule.
To update the configuration we will need the network interface, in this case, it’s ens160. To find the network interface name we will run the command.
ip -c link
Now we will add the following config to the wg0.conf file. For more information on iptables check the link here. PostUp and PostDown commands are when the WireGuard server starts and stops the VPN tunnel respectively.
sudo nano /etc/wireguard/wg0.conf
					##Commands -when vpn tunnel starts and stops##
PostUp = iptables -A FORWARD -i %i -j ACCEPT
PostUp = iptables -A FORWARD -o %i -j ACCEPT
PostUp = iptables -t nat -A POSTROUTING -o ens160 -j MASQUERADE


PostDown = iptables -D FORWARD -i %i -j ACCEPT
PostDown = iptables -D FORWARD -o %i -j ACCEPT
PostDown = iptables -t nat -D POSTROUTING -o ens160 -j MASQUERADE
Ubuntu Firewall changes
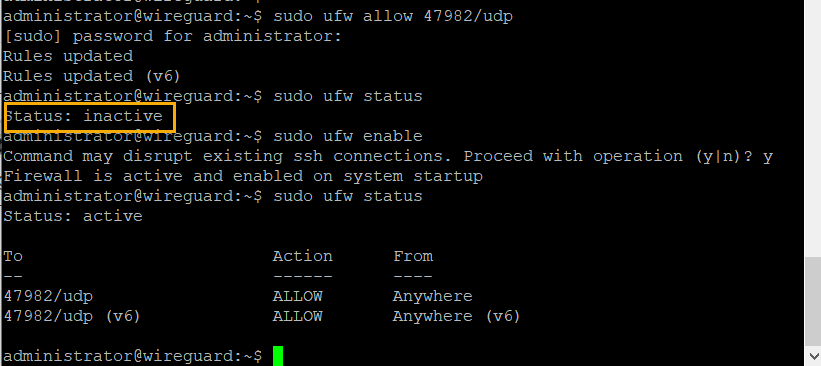
Since we are using a UDP port 47982 for the connection we will have to allow it through the Ubuntu Firewall. And then check the status.
					sudo ufw allow 47982/udp
sudo ufw status
If the status of the firewall is inactive then enable it and check the status
					sudo ufw enable
sudo ufw status
Once the firewall is enabled SSH will stop working, need to allow SSH through firewall.
sudo ufw allow OpenSSH
Enable IP forwarding
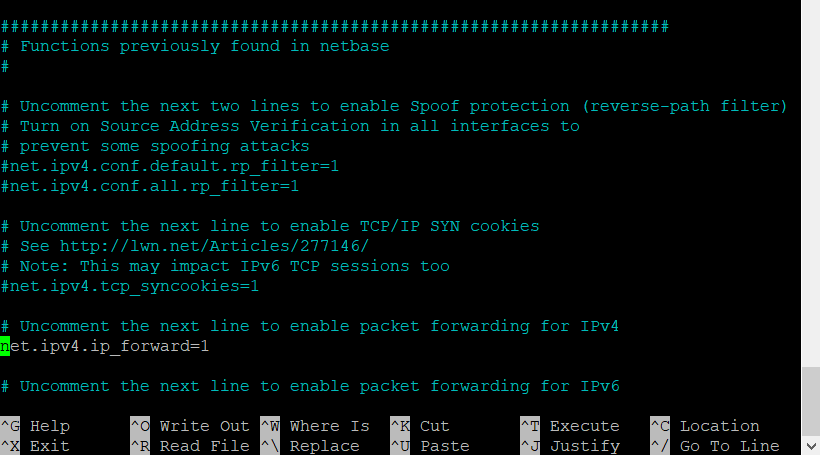
For NAT to work, we have to enable IP forwarding. We have to open the sysctl config file and uncomment the IP forwarding to enable it.
					sudo nano /etc/sysctl.conf
net.ipv4.ip_forward=1
Then load the new value.
sudo sysctl -p
Starting the WireGuard Server
WireGuard can be configured to start at boot time to run as a systemd service using the following command:
sudo systemctl enable wg-quick@wg0.service
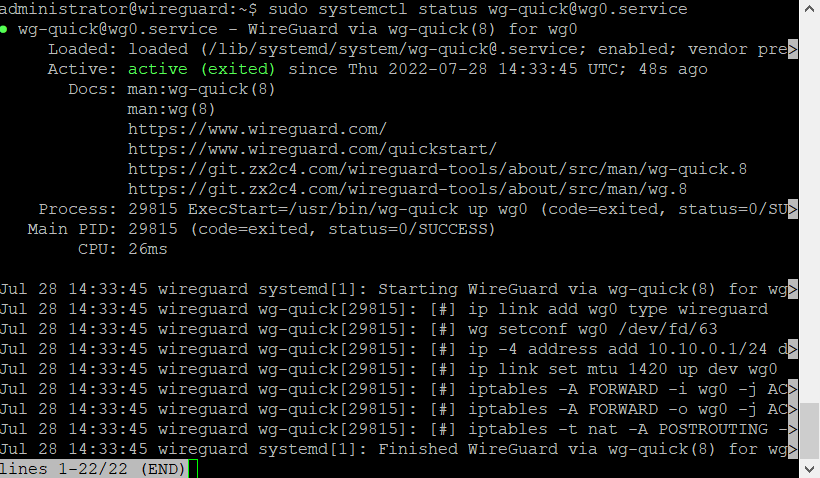
Then start the service and check the status
					sudo systemctl start wg-quick@wg0.service
sudo systemctl status wg-quick@wg0.service
Setting up WireGuard client/peer on Windows 10
Download and install the WireGuard client, The windows client can be downloaded from the WireGuard website. Once downloaded install it.
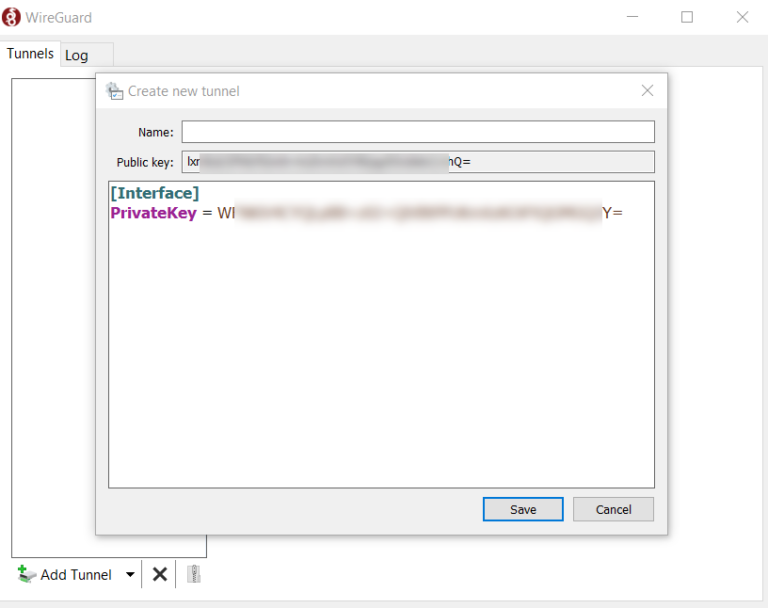
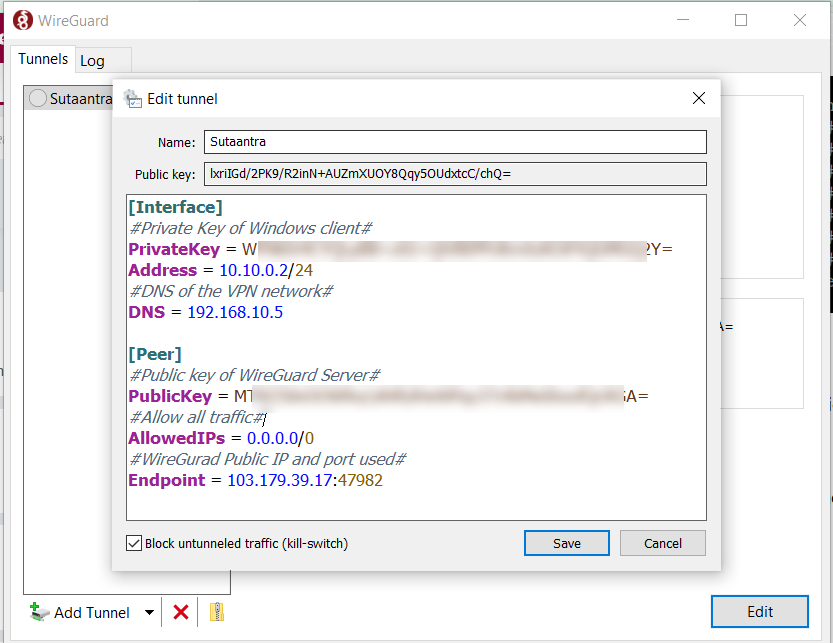
Add an empty tunnel, and WireGuard will automatically generate a public and private key. Note down the public and private keys. Then provide the other information and save it.
					[Interface]
#Private Key of Windows client#
PrivateKey = WxxxxxxxxxxxxxxxxxxxxxxxxxxxxxxxxxxxxxxxxxxxxxxxxxxxxxxxY=
Address = 10.10.0.2/24
#DNS of the VPN network#
DNS = 192.168.10.5

[Peer]
#Public key of WireGuard Server#
PublicKey = MxxxxxxxxxxxxxxxxxxxxxxxxxxxxxxxxxxxxxxxxxxxxxxxxxxxxxxxA=
#Allow all traffic#
AllowedIPs = 0.0.0.0/0
#WireGurad Public IP and port used#
Endpoint = 103.179.39.17:47982
Adding Windows client public key to WireGuard server
Now we will add the windows public key to the WireGuard server.
sudo nano /etc/wireguard/wg0.conf
					[Peer]
#public key of Windows Client#
PublicKey = lxriIGd/2PK9/R2inN+AUZmXUOY8Qqy5OUdxtcC/chQ=
#VPN tunnel IP of Windows client#
AllowedIPs = 10.10.0.2/24
Then we will restart the service and check the status.
Entire Config file of WireGuard server
So the entire configuration file of the WireGuard server should look like this
					###WireGuard VPN server-Ubuntu-wg0.conf file###
[Interface]

##WireGuard server Private Key##
PrivateKey = Mxxxxxxxxxxxxxxxxxxxxxxxxxxxxxxxxxxxxxxxxxxxs=

##WireGuard server private IP address"
Address = 10.10.0.1/24

##WireGuard server port##
ListenPort = 47982

SaveConfig = true

##Commands -when vpn tunnel starts and stops##
PostUp = iptables -A FORWARD -i %i -j ACCEPT
PostUp = iptables -A FORWARD -o %i -j ACCEPT
PostUp = iptables -t nat -A POSTROUTING -o ens160 -j MASQUERADE

PostDown = iptables -D FORWARD -i %i -j ACCEPT
PostDown = iptables -D FORWARD -o %i -j ACCEPT
PostDown = iptables -t nat -D POSTROUTING -o ens160 -j MASQUERADE

[Peer]
#public key of Windows Client#
PublicKey = lxxxxxxxxxxxxxxxxxxxxxxxxxxxxxxxxxxxxxxxxxxxxxQ=
#VPN tunnel IP of Windows client#
AllowedIPs = 10.10.0.2/24
Port forwarding in ISP modem allowing incoming connection on the firewall
If you see the network diagram, we have to forward the incoming connection on the public IP on port 47982 to the firewall IP of 192.168.1.30.
In the firewall, we have to allow the incoming connection and forward it to 192.168.10.20. To do that we need to create a network object with the IP of the WireGuard server, create a NAT, and allow it through the access list. I’m using ASA so it will look like this.
					object network WireGuard
host 192.168.10.20
nat (inside,outside) static interface service udp any 47982

access-list inbound extended permit udp any object WireGuard eq 47982
access-group inbound in interface outside
Testing out the connection
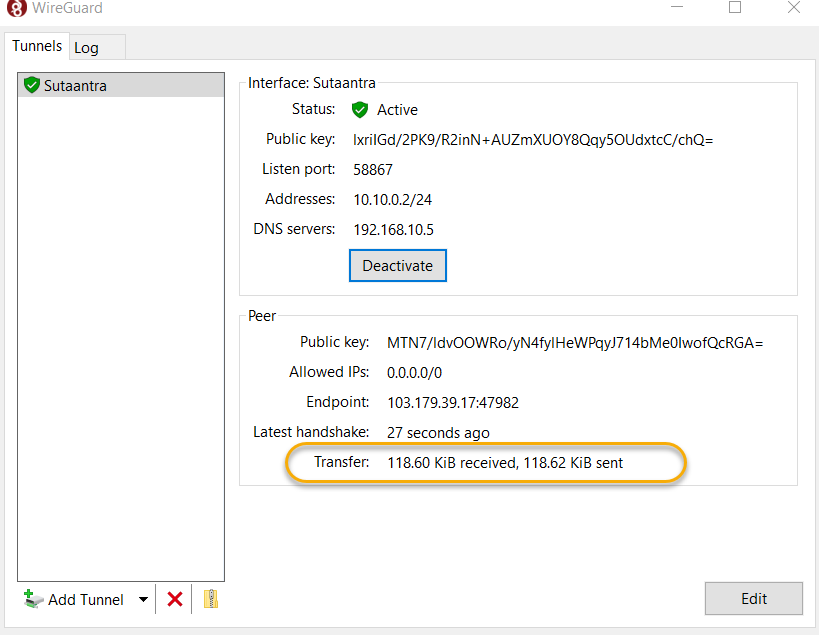
After setting up the tunnel from the Windows client, you can see some data transfer and receive, so the connection is active.
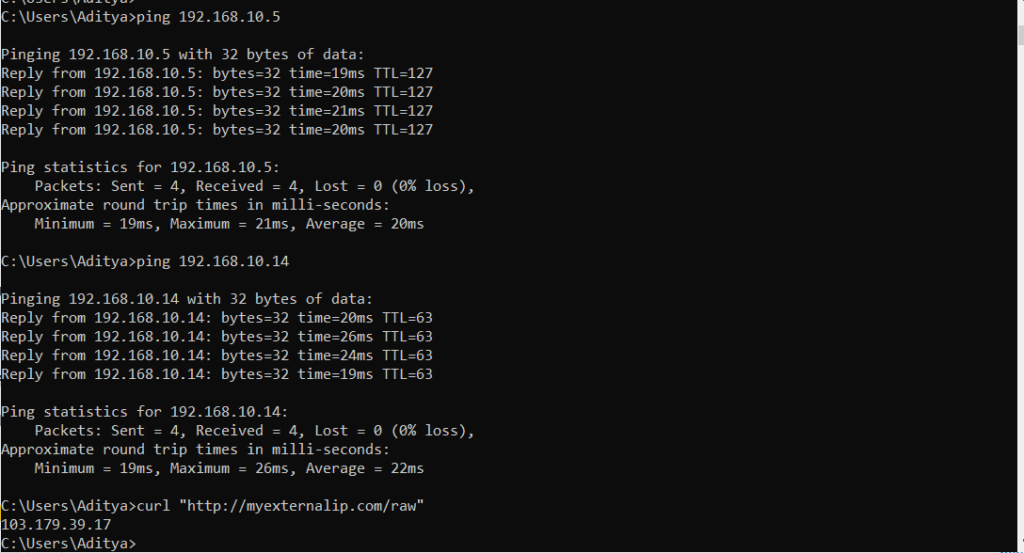
We will ping the NAS- 192.168.10.14 and DC-192.168.10.5 and see if it can ping. Also, we will check our public IP now using CMD.
curl "http://myexternalip.com/raw"
As you can see we can ping the NAS and DC, and the external IP is showing that of the Ubuntu server, so we have access to the network resources, and all internet traffic is routed through the WireGuard server.
Other post regarding WireGuard – How to setup WireGuard VPN on an iPhone
- KB170115








This Post Has One Comment
Pingback: How to setup WireGurad VPN on an iPhone | Sutaantra
Comments are closed.