Contents
Introduction
When we access a device using SSH we generally do it by either using a username/password or using SSH keys. So if an attacker gets access to the password or keys then they can easily gain access to the machine. So this type of login uses only one factor for login. To make it harder for the attacker to gain access to the device we can include another factor for authentication. Since we are using two pieces of information to log in it is called two-factor authentication (2FA) or multi-factor authentication (MFA).
In this article, we will use Google’s PAM (Pluggable Authentication Module) which generates the Time-based OTP (TOTP) as the second factor. In this process, the system generates a secret key, a unique 16 or 32-character alphanumeric code on the device which we will access via SSH. We will then scan the code or manually add the code to our mobile app like Google Authenticator/ Microsoft Authenticator. So both the device and the mobile app know the keys and generate the same OTP using the TOTP algorithm. Since it is time-based so the system time should be in sync for both the device and the mobile device otherwise it won’t work.
Here we would be accessing a VPS Ubuntu Server core 21.10 with username/password and Google PAM module which is free. It is also possible to use other PAM modules like Duo security, 1Password, Azure Active Directory, you can check the link.
Installing the PAM module package
Login to the server using SSH. Update the repository and install the google PAM module
					sudo apt-get update
sudo apt-get upgrade
sudo apt-get install libpam-google-authenticator
Once installed we will initialize the module
google-authenticator
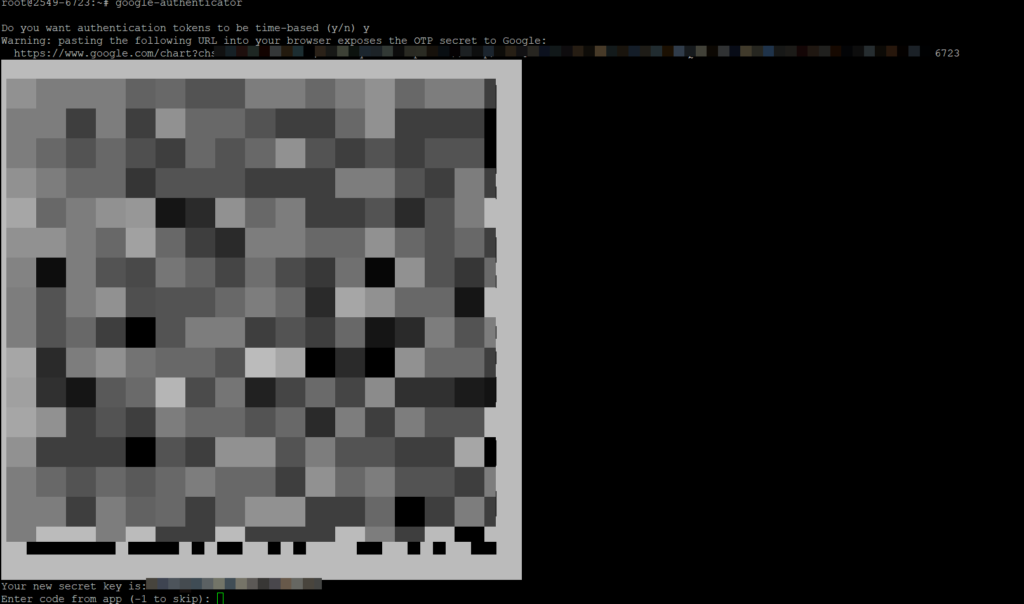
The app will then generate a QR code and ask a set of questions to complete the configuration
Do you want authentication tokens to be time-based (y/n) y
We will add the QR code to any authenticator like Google Authenticator or Microsoft Authenticator and back up the emergency code.
Do you want me to update your “/root/.google_authenticator” file (y/n) y
This will write the code to the file.
Do you want to disallow multiple uses of the same authentication
token? This restricts you to one login about every 30s, but it increases
your chances to notice or even prevent man-in-the-middle attacks (y/n) y
This will prevent multiple logins with the same code
By default, a new token is generated every 30 seconds by the mobile app.
In order to compensate for possible time-skew between the client and the server,
we allow an extra token before and after the current time. This allows for a
time skew of up to 30 seconds between the authentication server and client. Suppose you
experience problems with poor time synchronization. In that case, you can increase the window
from its default size of 3 permitted codes (one previous code, the current
code, the next code) to 17 permitted codes (the eight previous codes, the current
code, and the eight next codes). This will permit a time skew of up to 4 minutes
between client and server.
Do you want to do so? (y/n) n
Here we will answer no, so if there is a time difference between the device and the mobile app, it will not work.
If the computer that you are logging into isn’t hardened against brute-force
login attempts, you can enable rate-limiting for the authentication module.
By default, this limits attackers to no more than three login attempts every 30s.
Do you want to enable rate-limiting (y/n) y
This will restrict the number of login attempts per minute.
Finalizing the set-up
Still, the 2FA will not be working and we have to configure OpenSSH to use MFA.
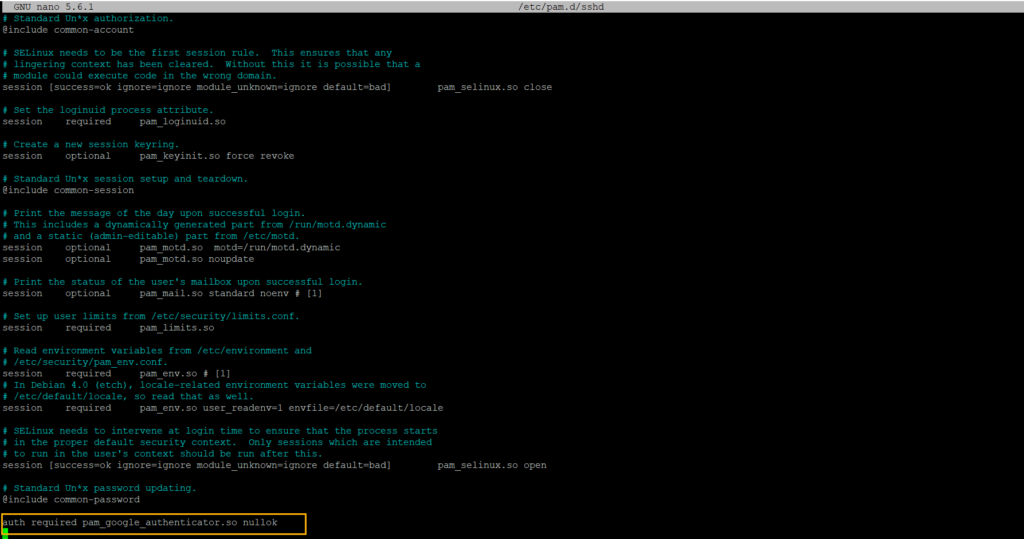
First, we will modify the sshd file and add the below line.
sudo nano /etc/pam.d/sshd
auth required pam_google_authenticator.so nullok
The nullok command allows users without 2FA to log in and makes PAM optional.
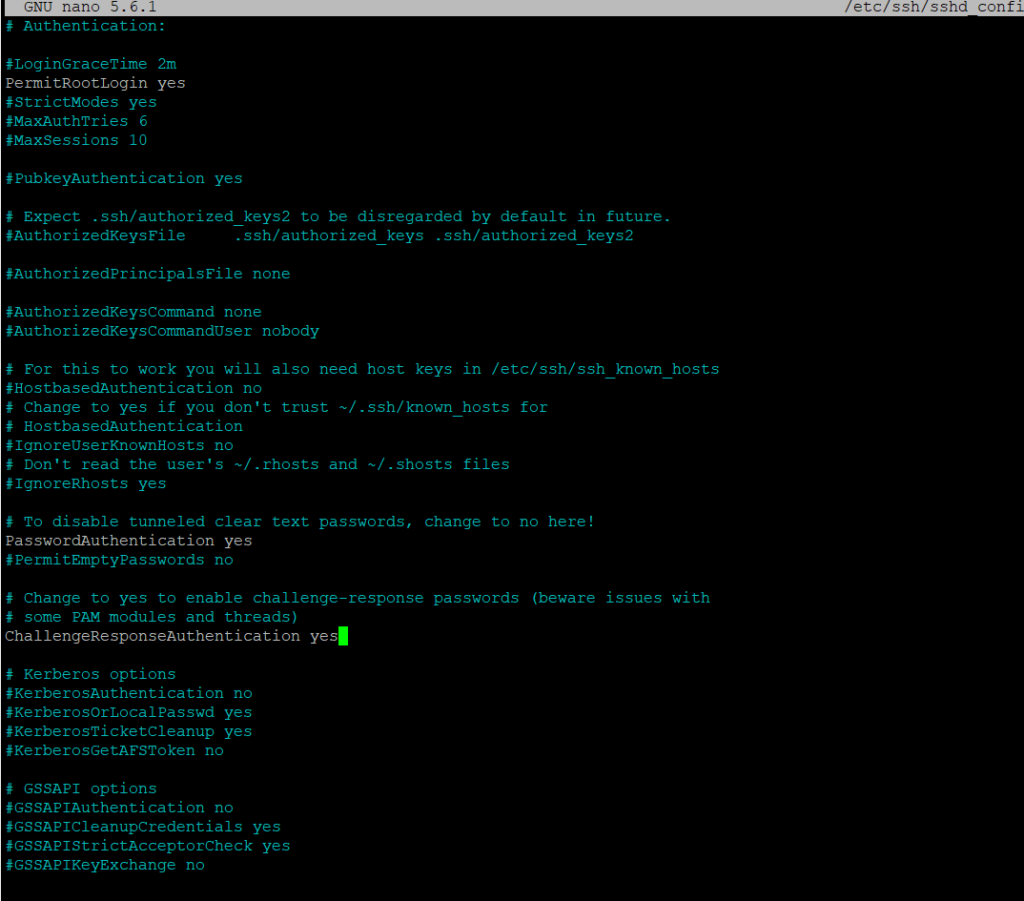
As the last step, we will modify sshd_config file to enable PAM.
sudo nano /etc/ssh/sshd_config
And change ChallengeResponseAuthentication to yes as below. This will complete the setup and then we will restart the SSH service for it to take effect.
sudo systemctl restart sshd.service
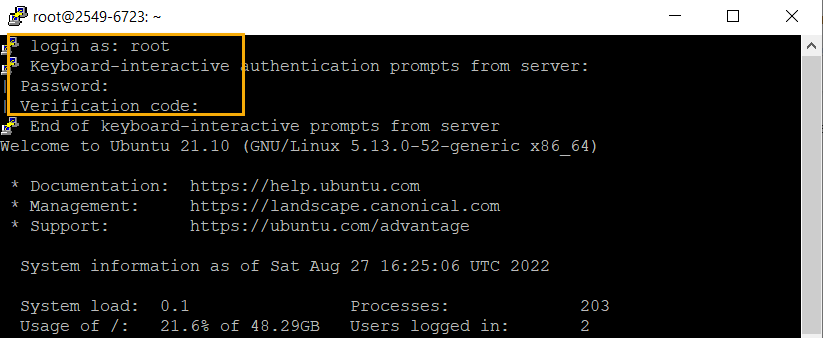
Next, we will test the set-up and it should work. Just a warning note, don’t close the initial connection until you tested the set-up with MFA.

Sometimes it may happen you changed or lost your phone and you don’t have the access to the OTP. In that case, you need to use the backup code that is generated when you initiate the set-up. If you don’t have access to the code also then you need to log in using another user who doesn’t have MFA enabled or through the console if it is a virtual machine.
To disable the 2FA, we can undo the changes we did on the sshd and sshd_config files.
- KB170119


